Quick Answer: How to Clean Fuel Injectors Safely
Can you use an ultrasonic cleaner for fuel injectors? Yes! It is the most effective method to remove stubborn carbon and varnish. The Golden Rules for Safety:
1.Never submerge electronic connectors or plastic bodies in harsh chemicals/high heat.
2.Use water-based, non-flammable cleaning solutions—never use gasoline or flammable solvents.
3.Limit cycle times to 10–30 minutes at a moderate temperature (40℃–50℃).
Table of Contents
-What Is a Fuel Injector and Why Does It Need Cleaning?
-Is Ultrasonic Cleaning Safe for Fuel Injectors?
-How Ultrasonic Fuel Injector Cleaning Works
-What Is the Best Ultrasonic Cleaning Solution for Fuel Injectors?
-Step-by-Step Guide to Cleaning Fuel Injectors with an Ultrasonic Cleaner
-How to Clean Fuel Injectors at Home Without Damaging Them
-Choosing the Right Fuel Injector Ultrasonic Cleaning Machine
-Diesel Injector Ultrasonic Cleaning: What Should You Know?
-Common Mistakes When Using an Ultrasonic Fuel Injector Cleaner
-FAQ About Ultrasonic Cleaning for Fuel Injectors
Introduction
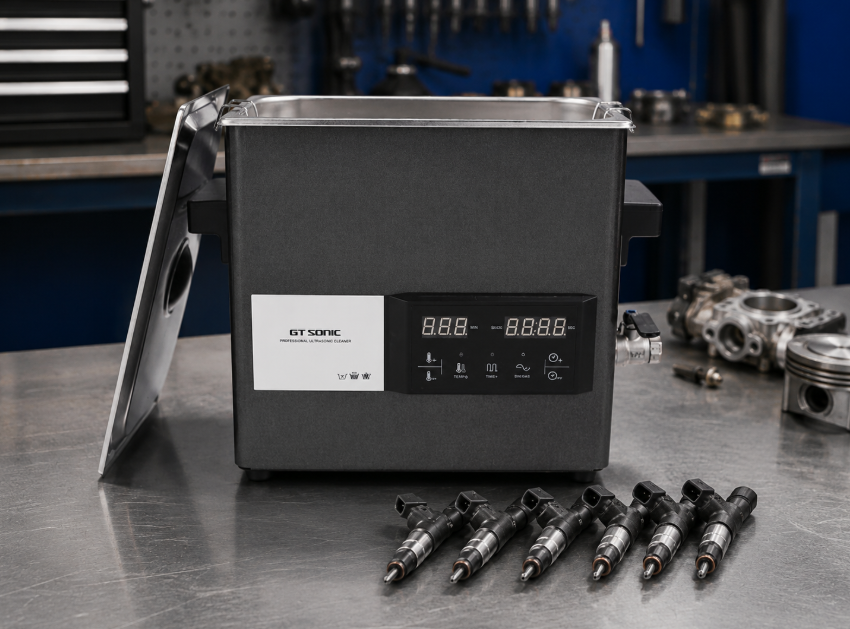
A healthy engine relies on a precise mix of air and fuel. When fuel injectors become clogged, it disrupts fuel atomization, leading to a rough idle, poor acceleration, increased fuel consumption, and degraded engine performance. Over time, heat and fuel residues create stubborn carbon buildup and varnish deposits that manual scrubbing simply cannot reach.
This is where an ultrasonic cleaner becomes invaluable. By utilizing high-frequency sound waves, ultrasonic cleaning penetrates the microscopic internal channels of the fuel nozzle. It safely and thoroughly strips away contaminants without the need for harsh abrasive tools, restoring the injector’s original spray pattern and efficiency.
What Is a Fuel Injector and Why Does It Need Cleaning?
A fuel injector is an electronically controlled valve that sprays fuel into the engine as a fine mist. If the fuel cannot atomize properly, the engine cannot burn it efficiently.
Common Signs of Dirty Fuel Injectors
When injectors are choked by debris, your vehicle will usually let you know through several unmistakable warning signs:
1.Rough idle: The vehicle shakes or stumbles while stationary.
2.Poor acceleration: A noticeable lag when you step on the gas pedal.
3.Higher fuel consumption: The ECU compensates for poor atomization by dumping more fuel.
4.Engine misfires: Incomplete combustion causes the engine to sputter.
5.Uneven spray pattern: Fuel drops instead of misting, hurting combustion efficiency.
6.Hard starting: Difficulties turning the engine over, especially when cold.
What Causes Fuel Injectors to Get Clogged?
Injectors operate in a brutal environment. The most common culprits behind their degradation include:
1.Carbon buildup: Leftover fuel bakes onto the nozzle tips after the engine is turned off.
2.Varnish deposits: Chemical compounds in gas naturally settle into a sticky residue over time.
3.Low-quality fuel: Cheaper fuels lack the premium detergents needed to keep injectors clean.
4.Long-term storage: Sitting stagnant causes fuel to oxidize and turn into sludge.
5.Fine particles: Microscopic debris that bypasses an aging fuel filter.
Is Ultrasonic Cleaning Safe for Fuel Injectors?
Is it safe to clean fuel injectors in an ultrasonic cleaner? The short answer is yes, but it requires strict adherence to specific guidelines to prevent electrical or material damage.
When Ultrasonic Fuel Injector Cleaning Is Safe
Ultrasonic cleaning is highly safe and recommended under the following conditions:
1.Metal-bodied fuel injectors: Traditional steel or iron housings handle ultrasonic waves perfectly.
2.Removable fuel injectors: Components that can be completely isolated from the vehicle block.
3.Port Fuel Injection (PFI) injectors: Standard multi-port injectors are highly resilient to this process.
4.Mechanical diesel injectors: Robust build qualities make them ideal candidates for deep ultrasonic cycles.
5.Suspended electronics: The process is safe as long as the exposed electronic plug remains above the fluid line.
When You Should Be Careful
Exercise extreme caution or seek professional help if you encounter these risk factors:
1.Electronic connectors: Submerging electrical pins can cause short circuits or internal corrosion.
2.O-rings and seals: Rubber components can degrade; always remove them before cleaning.
3.Plastic-bodied injectors: High tank temperatures or aggressive chemicals can warp or crack plastic composites.
4.Modern GDI or Piezo injectors: Gasoline Direct Injection (GDI) and advanced piezo diesel injectors feature incredibly tight tolerances and delicate internal crystals that require specialized, lower-frequency handling.
How Ultrasonic Fuel Injector Cleaning Works
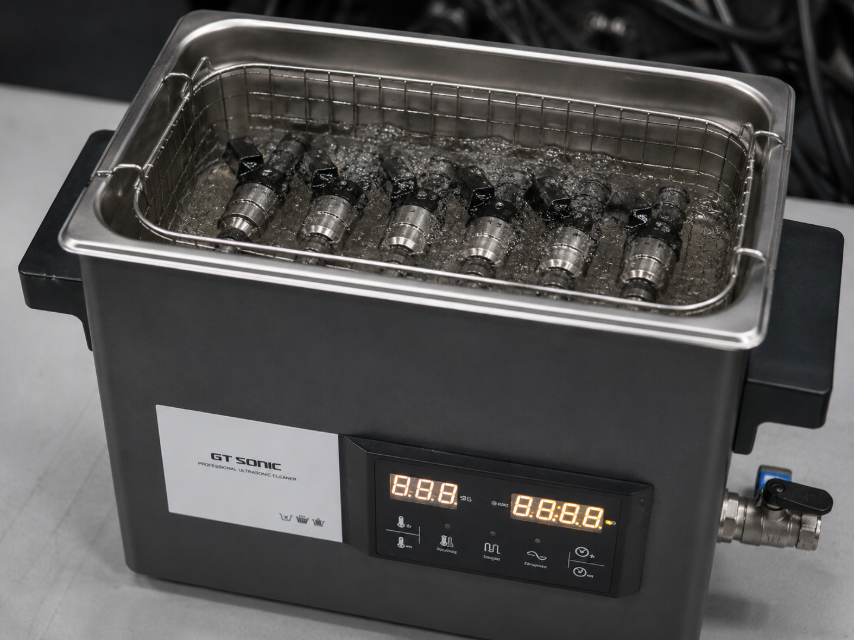
Understanding the science behind ultrasonic fuel injector cleaning explains why it outperforms traditional maintenance methods.
How Cavitation Removes Carbon and Fuel Residue
The core mechanism is a process called cavitation. The machine's transducers generate high-frequency sound waves (usually 40kHz), creating millions of microscopic vacuum bubbles in the liquid. As these bubbles travel, they collapse violently against the surface of the injector. This implosion creates localized, high-energy micro-jets that blast away carbon, varnish, and oil mud from hidden recesses without scratching the metal.
Why It Can Clean Better Than Soaking or Manual Cleaning
Compared to legacy methods, ultrasonic technology offers superior performance:
1.Manual cleaning: Wire brushes or needles cannot reach internal passages and risk damaging the delicate nozzle holes.
2.Chemical soaking: Passive soaking relies purely on chemical erosion, which struggles against heavily baked-on carbon.
3Ultrasonic advantage: Combines chemical action with kinetic cavitation energy, aggressively scrubbing small grooves, hidden internal channels, and microscopic nozzle apertures simultaneously.
What Is the Best Ultrasonic Cleaning Solution for Fuel Injectors?
Choosing the right best ultrasonic cleaning solution for fuel injectors dictates whether your project ends in success or a ruined component.
What Liquid to Use in an Ultrasonic Cleaner for Fuel Injectors
For optimal and safe results, always stick to verified formulas:
1.Water-based, non-flammable specialized solutions: Look for specialized automotive ultrasonic concentrates (often containing mild surfactants and degreasers).
2.Carbon-targeted degreasers: Ensure the formula is specifically rated to break down heavy carbon deposits and fuel varnish.
3.Strict dilution ratios: Always mix the concentrate with distilled water according to the manufacturer's specification sheet.
4.Clean water rinse: Keep a separate batch of clean, deionized water ready to neutralize any remaining chemical films afterward.
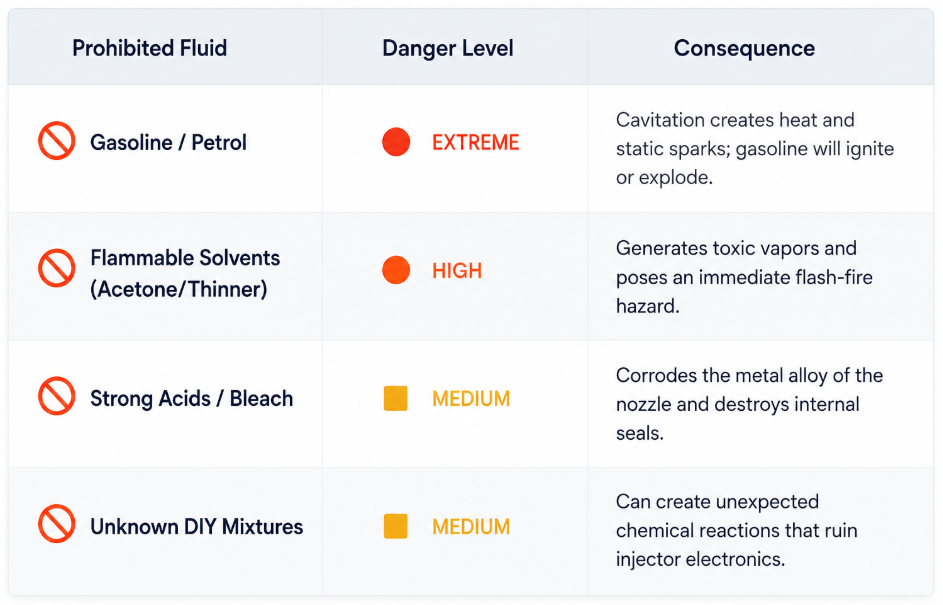
What Fluids Should Be Avoided?
⚠️ CRITICAL WARNING: Never use the following fluids in an ultrasonic tank.
Step-by-Step Guide to Cleaning Fuel Injectors with an Ultrasonic Cleaner
Follow this structured walkthrough for safe, professional-grade cleaning fuel injectors with ultrasonic cleaner.
Step 1: Remove and Inspect the Fuel Injectors
Safely depressurize your vehicle's fuel system and remove the fuel rail. Carefully pull out the injectors. Before cleaning, inspect them for cracked casings. Gently pry off the rubber O-rings and plastic spacers, and pull out the internal micro-basket filters using an injector removal tool.
Step 2: Prepare the Ultrasonic Cleaner and Cleaning Fluid
Fill the stainless steel tank with your diluted water-based cleaning solution, keeping it within the minimum and maximum fill lines. Turn on the machine and run a Degas cycle for 5 to 10 minutes. This removes trapped air bubbles from the fresh water, ensuring optimal cavitation energy during the actual wash. Set the temperature between 40℃ and 50℃.
Step 3: Place the Fuel Injectors Correctly
Place the injectors inside a specialized cleaning basket or beaker holder. Never place injectors directly on the bottom of the tank, as this dampens ultrasonic vibrations and can overheat the transducers. Position them upright or angled so that the nozzle tip is submerged in the high-cavitation zone, while keeping the upper electronic plugs safely dry above the water line.
Step 4: Run the Ultrasonic Cleaning Cycle
Lower the basket into the preheated solution. Set the digital timer for 10 to 20 minutes for light buildup, or up to 30 minutes for heavily carbonized tips. If you have an injector pulse tool, connect it now to cycle the valves open and closed while submerged; this allows the cavitation bubbles to scrub the internal passages clean.
Step 5: Rinse, Dry, and Inspect Again
Once the cycle finishes, lift the basket out. Immediately rinse the injectors with clean distilled water to remove any soapy film. Use a can of compressed air to blow out all moisture from the internal channels and electrical terminals. Allow them to air-dry completely. Finally, push in new micro-basket filters and lubricate fresh rubber O-rings before reinstallation.
How to Clean Fuel Injectors at Home Without Damaging Them
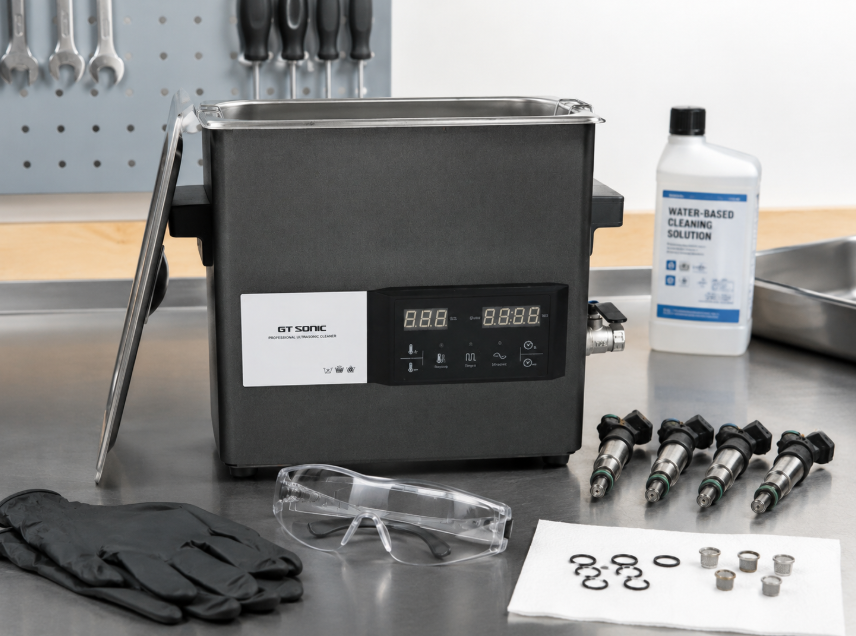
If you want to try how to clean fuel injectors at home, a small-scale setup can deliver fantastic results if you have the right tools.
Basic Tools You Need
1.Benchtop ultrasonic cleaner (1.3L to 3L capacity)
2.Approved water-based ultrasonic cleaner concentrate
3.Safety gear (nitrile gloves and protective goggles)
4.Distilled water & compressed air canister
5.Suspension basket or beaker mesh
6.Optional: DIY electronic injector pulse tool (to open the solenoid valve)
DIY Cleaning vs Professional Injector Cleaning
1.DIY Cleaning: Best for standard maintenance, older vehicles with port injection, and resolving minor idling issues. Highly cost-effective for car enthusiasts.
2.Professional Cleaning: Necessary for modern GDI/direct injection systems, high-pressure diesel lines, severely clogged units requiring reverse-flushing, or when you need official spray-pattern and flow-volume matching documentation.
Choosing the Right Fuel Injector Ultrasonic Cleaning Machine
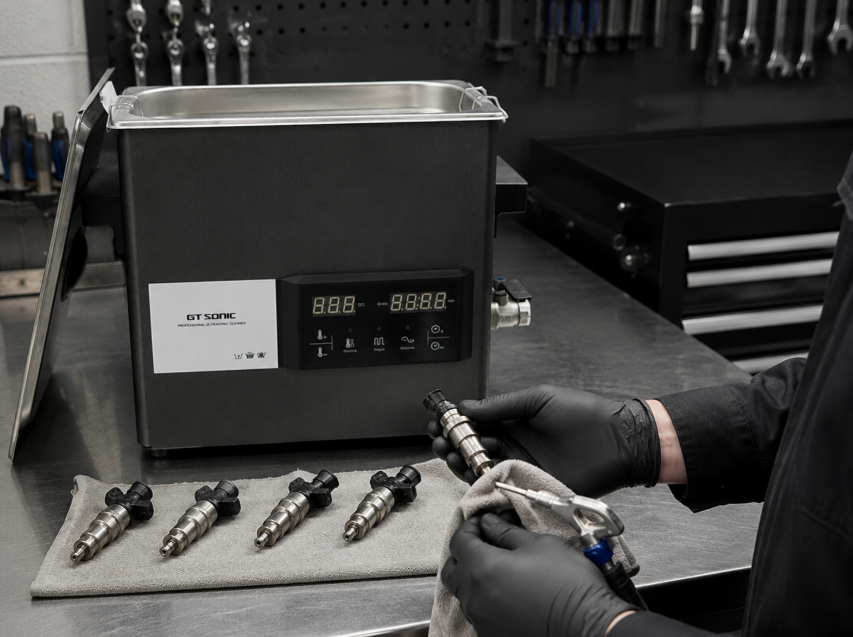
Investing in a dedicated fuel injector ultrasonic cleaning machine requires looking at specific industrial parameters.
What Size Ultrasonic Cleaner Is Suitable for Fuel Injectors?
3L to 6L Units: Perfect for DIYers, independent mechanics, or small garages cleaning 4 to 8 injectors per batch.
10L and Larger Units: Designed for full-scale commercial auto shops, engine rebuild facilities, or industrial parts cleaning lines where multiple parts (like carburetors and manifolds) are cleaned at once.
Recommended Features for Injector Cleaning
Look for these core specifications when purchasing a machine:
1.40kHz Frequency: The gold standard frequency for automotive carbon removal.
2.Heating Element: Accelerates chemical breakdown of oils (20℃−80℃ range).
3.Digital Timer Control: Precision tracking to avoid over-cleaning.
4.Industrial SUS304 Tank: Resists chemical corrosion and extends machine life.
5.Degas Function: Essential for maximizing ultrasonic wave propagation.
When Workshops Need a Larger Ultrasonic Cleaner
For professional workshops, upgrading to a commercial-grade unit is essential. Brands like GT SONIC engineer heavy-duty units optimized for demanding automotive environments. A larger, robust machine easily handles:
1.High-volume auto repair shops and dedicated injector service centers.
2.Simultaneous cleaning of complex parts like carburetors, EGR valves, and engine components.
3.Commercial engine rebuilders requiring continuous, stable power output.
Diesel Injector Ultrasonic Cleaning: What Should You Know?
Handling diesel injector ultrasonic cleaning demands extra attention due to the ultra-tight engineering tolerances of diesel systems.
Are Diesel Injectors Suitable for Ultrasonic Cleaning?
Older, purely mechanical diesel injectors respond incredibly well to ultrasonic cleaning because of their rugged all-metal construction. However, modern Common Rail Diesel (CRD) injectors or advanced piezo-electric injectors feature incredibly sensitive electronic components and crystal stacks. These should never be fully submerged or subjected to uncalibrated ultrasonic frequencies, as internal element cracking can occur.
Why Diesel Injectors May Need Professional Testing
Because diesel systems operate under massive pressures (often exceeding 2,000 bar), any microscopic imperfection changes engine dynamics. After an ultrasonic bath, diesel injectors should always be placed on a calibrated test bench to verify spray atomization, accurate return flow volume, and high-pressure leak-tightness.
Common Mistakes When Using an Ultrasonic Fuel Injector Cleaner
Avoid these critical pitfalls to protect your valuable automotive parts when operating an ultrasonic fuel injector cleaner:
1.Using the Wrong Cleaning Fluid: Resorting to gasoline, kerosene, or highly acidic household chemicals because they are cheap. This causes fires or ruins metal surfaces.
2.Submerging Electronic Parts: Dropping the entire injector into the liquid, allowing water to sleep into the electrical housing and ruin the internal solenoid coil.
3.Skipping Rinsing and Drying: Reinstalling injectors with chemical soap residue or trapped water pockets, leading to immediate internal rust or fuel contamination.
4.Cleaning for Too Long: Leaving injectors in an active ultrasonic tank for hours. Over-exposure can cause micro-cavitation pitting on precision-machined mating surfaces.
FAQ About Ultrasonic Cleaning for Fuel Injectors
1. What is the most effective way to clean fuel injectors?
The most reliable method is removing the injectors, placing them in a heated ultrasonic cleaner with a dedicated water-based solution, and pulsing the solenoids electronically during the wash. Follow up with a thorough rinse, air dry, and spray-pattern flow test.
2. Can ultrasonic cleaning fix all fuel injector problems?
No. Ultrasonic waves only remove physical blockages like carbon, varnish, and dirt. They cannot repair burned-out internal solenoid coils, cracked plastic housings, broken return springs, or severe physical nozzle wear.
3. How long should fuel injectors be cleaned in an ultrasonic cleaner?
A standard cleaning cycle takes between 10 and 30 minutes depending on how dirty the components are. It is always better to run two short 10-minute cycles and check progress rather than one excessively long cycle.
4. Can I use an ultrasonic cleaner for carburetors and other auto parts?
Absolutely! Ultrasonic cleaners are highly versatile. The same machine can clean carburetors, valves, spark plugs, brackets, and various small metal hardware items—just be sure to match the cleaning fluid to the specific type of metal, such as aluminum requiring specialized pH-neutral solutions.
Conclusion
Safely cleaning fuel injectors with an ultrasonic cleaner comes down to precision, safety, and using the right equipment. By selecting a dedicated, non-flammable water-based solution, protecting sensitive electronic connectors from submersion, and closely regulating time and temperature, you can easily restore optimal engine performance and efficiency.
For professional automotive workshops, repair centers, and enthusiast garages, a reliable and high-performance ultrasonic machine makes all the difference. GT SONIC provides industry-leading, highly consistent ultrasonic cleaning solutions designed specifically for fuel injectors, carburetors, and precision engine components. Explore our robust catalog to elevate your shop's diagnostic and cleaning standards today!


