Laboratory Ultrasonic Cleaner Guide: How It Works, Uses, and Best Practices
Author: Zoey
Date: 2026-06-27
Read: 15min
Quick Answer
1. A laboratory ultrasonic cleaner uses high-frequency sound waves to create cavitation bubbles in a liquid bath.
2. These bubbles collapse and help remove particles, oils, grease, residue, and contaminants from glassware, instruments, PCB boards, and complex surfaces.
3. Best results depend on the cleaning solution, Degas mode, temperature, time, loading method, rinsing, drying, and material compatibility.
4. A suitable lab ultrasonic bath should match the item size, residue type, cleaning frequency, and daily laboratory workflow.
What Is a Laboratory Ultrasonic Cleaner?
A laboratory ultrasonic cleaner is a cleaning device used to remove contamination from lab glassware, instruments, sample containers, small metal tools, PCB boards, and precision components. Instead of relying only on manual brushing or soaking, it uses ultrasonic cavitation to reach narrow gaps, blind holes, glass joints, threads, and other hard-to-clean areas.
In a typical ultrasonic cleaner laboratory setup, the items are placed in a stainless steel tank filled with cleaning liquid. When the machine starts, ultrasonic transducers generate high-frequency sound waves through the liquid. These waves create microscopic bubbles that collapse near the surface of the items, helping lift away soil and residue.
What Does a Laboratory Ultrasonic Cleaning Machine Do?
A laboratory ultrasonic cleaning machine helps remove dust, fingerprints, oils, grease, dried residue, chemical deposits, biological debris, and fine particles. It is commonly used in research labs, medical labs, dental labs, analytical labs, electronics labs, university laboratories, and industrial testing environments.
Compared with manual cleaning, a lab ultrasonic bath can improve cleaning consistency and reduce labor. However, the final cleaning result still depends on the right cleaning solution, correct loading method, proper time and temperature, rinsing, and drying.
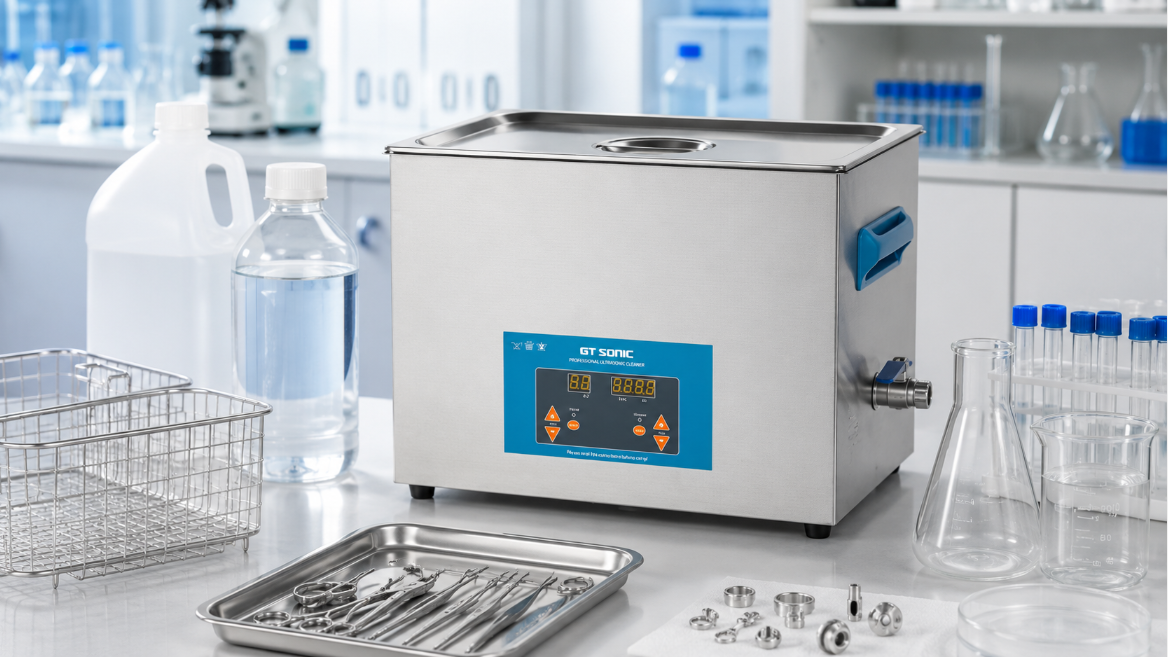
Main Parts of a Lab Ultrasonic Bath
|
Part
|
Function
|
|
Stainless steel tank
|
Holds the cleaning liquid and items
|
|
Ultrasonic transducers
|
Generate ultrasonic vibration
|
|
Heater
|
Helps remove oils, grease, waxy films, and sticky residues
|
|
Digital timer
|
Controls the cleaning cycle
|
|
Degas mode
|
Removes trapped air from fresh cleaning solution
|
|
Basket or tray
|
Keeps items away from the tank bottom
|
|
Lid
|
Reduces splashing, heat loss, and noise
|
|
Drain valve
|
Makes liquid replacement easier on larger tanks
|
A laboratory ultrasonic bath with digital control, heating, Degas mode, and a suitable basket is easier to use in repeatable lab cleaning workflows.
How a Lab Ultrasonic Bath Works?
A lab ultrasonic bath works through cavitation. This is the key reason ultrasonic cleaning equipment can remove soil from places that brushes, cloths, and manual rinsing may not reach.
Cavitation and Soil Removal
High-frequency sound waves create alternating high-pressure and low-pressure zones in the cleaning liquid. During this process, microscopic cavitation bubbles form and collapse. When these bubbles implode near the surface of glassware, instruments, or small parts, they release localized cleaning energy.
This action helps remove:
1.dust and fine particles
2.oils and grease
3.fingerprints
4.chemical residue
5.biological residue
6.flux residue
7.dried contamination
8.particles trapped in small gaps
This explains how an ultrasonic cleaner removes soil. The cleaning effect comes from cavitation, liquid movement, and the chemical action of the ultrasonic cleaning solution.
Why It Cleans Complex Surfaces?
A laboratory ultrasonic cleaner bath is useful because cavitation can reach hidden or intricate areas. These include glass joints, pipette parts, narrow tubes, threaded parts, instrument hinges, PCB gaps, small holes, and precision metal components.
For laboratory users, this is one of the main advantages of ultrasonic cleaning equipment. It can help clean areas that are difficult to reach manually, as long as the item, liquid, and cleaning settings are suitable.
Common Ultrasonic Cleaner Uses in Laboratory
Ultrasonic cleaner uses in laboratory environments vary by workflow. Some labs use ultrasonic cleaning for routine glassware, while others use it for instruments, sample containers, PCB boards, or precision parts.
Lab Glassware and Sample Containers
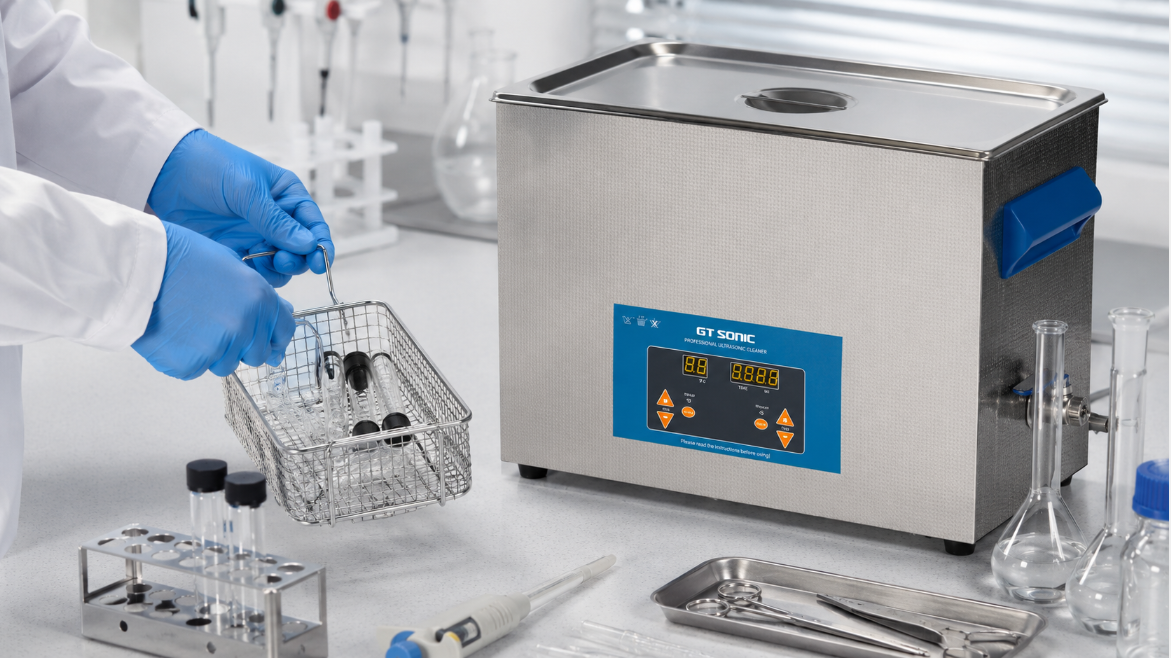
A laboratory ultrasonic cleaner is commonly used for beakers, flasks, test tubes, sample vials, glass joints, and pipette parts. It can help remove light residue, dust, fingerprints, water-soluble contamination, and particles from areas that are difficult to brush.
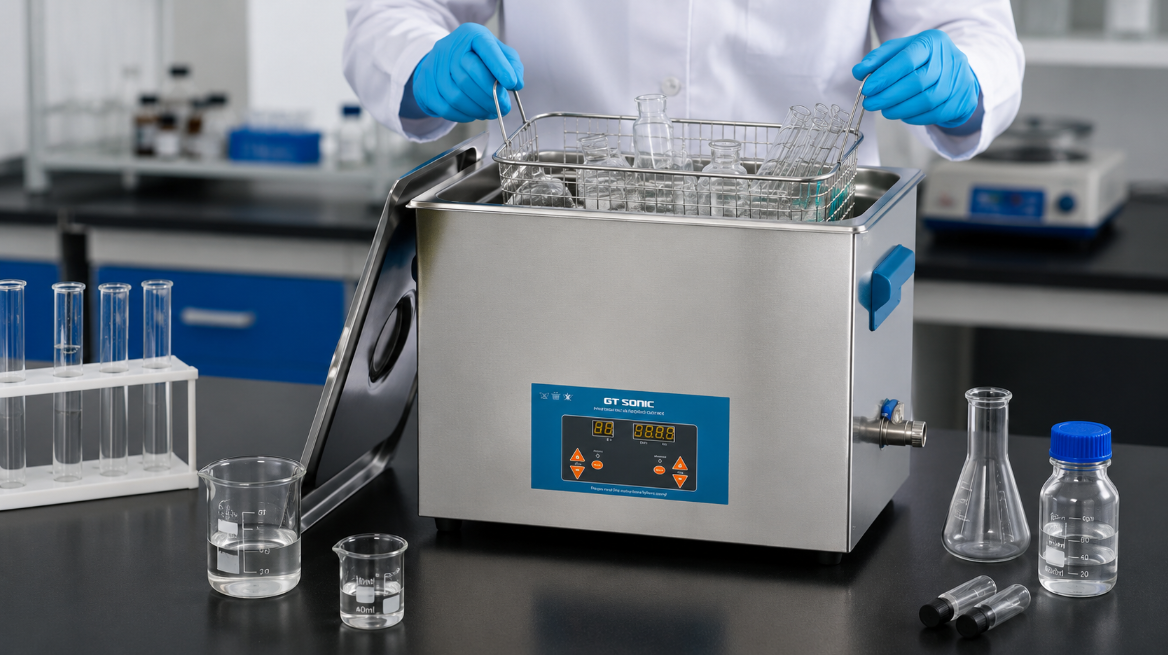
For routine glassware cleaning, items should not be overcrowded. They should be fully submerged and placed in a basket or holder to avoid direct contact with the tank bottom.
Metal Instruments and Stainless Steel Tools
Laboratory ultrasonic cleaning equipment is also useful for tweezers, clamps, stainless steel instruments, small metal fixtures, and reusable tools. A heated ultrasonic cleaner may improve results when the contamination includes oils, grease, waxy films, or sticky residue.
Material compatibility still matters. Some metals, coatings, or mixed-material assemblies may need special cleaning solutions, lower temperature, or shorter cleaning time.
PCB Boards and Electronic Components
Ultrasonic cleaning can be used for selected PCB boards and electronic components, but it requires caution. Not all electronics are suitable for ultrasonic cleaning. Components such as microphones, speakers, MEMS sensors, batteries, displays, or sealed assemblies may be damaged by liquid or vibration.
For PCB cleaning, labs should use an electronics-safe cleaning solution, short cleaning cycles, controlled temperature, and complete drying before power-on. The drying process is just as important as the cleaning cycle.
Medical and Dental Instrument Pre-Cleaning
A laboratory ultrasonic bath can support medical and dental instrument pre-cleaning by removing debris from hinges, grooves, and complex tool surfaces. However, ultrasonic cleaning is not the same as sterilization.
For medical or dental workflows, ultrasonic cleaning should be treated as a pre-cleaning step before later disinfection or sterilization according to the required protocol.
Sample Preparation and Degassing Workflows
In some laboratory workflows, ultrasonic cleaning equipment can also support sample preparation, dispersion, emulsification, liquid degassing, or small-batch sample handling. A degas ultrasonic cleaner can help remove trapped air from fresh liquid before cleaning or sample-related use.
This is especially useful when stable cavitation is needed during the first cleaning cycle after replacing the solution.
What Can and Cannot Be Cleaned in a Laboratory Ultrasonic Bath?
A laboratory ultrasonic cleaner is useful, but not every item should be placed in the tank. Material compatibility, item structure, cleaning liquid, and temperature should be checked before cleaning.
Suitable Items
|
Item Type
|
Suitability
|
Notes
|
|
Glassware
|
Usually suitable
|
Check cracks and fragile joints
|
|
Stainless steel tools
|
Usually suitable
|
Use compatible cleaning solution
|
|
Sample vials
|
Usually suitable
|
Avoid overcrowding
|
|
Pipette parts
|
Sometimes suitable
|
Check manufacturer guidance
|
|
PCB boards
|
Sometimes suitable
|
Dry completely before power-on
|
|
Dental tools
|
Often suitable
|
Pre-cleaning only
|
|
Precision parts
|
Often suitable
|
Match chemistry and cleaning time
|
Items That Need Caution or Should Be Avoided
Some items may be damaged by ultrasonic vibration, heat, or liquid exposure. These include glued parts, painted parts, coated tools, soft plastics, rubber parts, aluminum parts, porous materials, batteries, sealed electronics, microphones, speakers, MEMS sensors, heat-sensitive assemblies, and unknown materials.
Dissimilar metals should also be handled carefully, especially when corrosion risk exists. When the material is uncertain, start with a short test cycle, lower temperature, and a compatible cleaning solution.
Step-by-Step Guide: How to Use a Lab Ultrasonic Cleaner
Correct operation is important for cleaning performance and equipment life. The following steps can be used as a practical starting point for many laboratory ultrasonic cleaning workflows.
Step 1: Prepare the Cleaning Bath
Fill the tank to the correct liquid level. Use distilled water or DI water when required, especially when mineral residue or water spots are a concern. Add a suitable ultrasonic cleaning solution based on the residue type and material.
Plain water can transmit ultrasonic energy, but it may not be enough for oils, grease, organic residue, flux, or stubborn contamination. For most lab cleaning tasks, the cleaning chemistry should be selected carefully.
Step 2: Degas the Fresh Solution
Degas removes trapped air from fresh liquid. This helps stabilize cavitation and improves cleaning consistency during the first cycle.
If the laboratory ultrasonic cleaning machine has Degas mode, run it after adding fresh solution. Degassing is especially useful when the solution has just been mixed, replaced, or heated.
Step 3: Load Items Correctly
Always use a basket, tray, or holder. Do not place items directly on the tank bottom, because this may affect ultrasonic performance and damage the tank or items.
Items should be fully submerged, separated, and not stacked. Fragile glassware should not touch other glass items during cleaning. Overloading the basket can reduce cleaning performance and cause uneven results.
Step 4: Set Time and Temperature
Cleaning time depends on the residue, material, tank size, solution, and ultrasonic power. Many routine lab tasks can start with short cycles, then be adjusted based on inspection results.
A heated ultrasonic cleaner can be useful for oils, grease, waxy films, and sticky residues. However, higher temperature is not always better. Plastics, rubber parts, coated tools, biological residue, and some electronic components may require lower temperature or room-temperature cleaning.
Step 5: Rinse, Dry, and Inspect
After cleaning, rinse items with clean water or DI water to remove remaining detergent or loosened residue. Dry the items completely to prevent water spots, corrosion, contamination, or electrical failure.
For PCB boards and precision metal parts, drying is critical. Use air drying, lint-free drying, warm air, or a drying oven if compatible with the material. After drying, inspect the item and adjust time, temperature, or solution concentration if needed.
Cleaning Solution Guide for Laboratory Ultrasonic Cleaners
The ultrasonic cleaning solution plays a major role in cleaning performance. Cavitation loosens contamination, but the solution helps wet the surface, reduce surface tension, dissolve or lift residue, and suspend removed dirt.
Why Plain Water Is Often Not Enough
Plain water can carry ultrasonic energy, but it is limited for oily, greasy, waxy, organic, or flux-related residue. DI water can help reduce mineral deposits and water spots, but it may still need a compatible detergent or cleaning agent for difficult contamination.
In a lab ultrasonic bath, the cleaning liquid should match both the contaminant and the material being cleaned.
Match Cleaning Solution to Residue Type
|
Residue Type
|
Suggested Cleaning Approach
|
|
Dust / loose particles
|
DI water or mild detergent
|
|
Fingerprints / light oils
|
Neutral or mild alkaline cleaner
|
|
Oils / grease
|
Alkaline ultrasonic cleaning solution
|
|
Biological residue
|
Enzymatic cleaner if compatible
|
|
Flux / PCB residue
|
Electronics-safe cleaning solution
|
|
Mineral deposits
|
Compatible acidic cleaner, used carefully
|
|
Mixed materials
|
Neutral, material-safe solution
|
Liquids to Avoid
Do not use flammable liquids directly in a standard ultrasonic cleaner. This includes alcohol, IPA, acetone, gasoline, toluene, and other volatile solvents. Ultrasonic agitation and heating can increase vapor release and fire risk.
Strong mineral acids and incompatible chemicals should also be avoided because they may damage the stainless steel tank, basket, or cleaned items. Always follow the cleaning solution instructions, SDS, and laboratory safety procedures.
Laboratory Ultrasonic Cleaner Settings: Time, Temperature, and Frequency
The correct settings depend on the cleaning task. The values below should be treated as starting points, not fixed rules.
Time Setting Reference
|
Cleaning Task
|
Starting Point
|
|
Light glassware residue
|
3–5 minutes
|
|
Routine lab tools
|
5–10 minutes
|
|
Oily or sticky residue
|
10–15 minutes
|
|
Delicate parts
|
Short cycle, inspect often
|
|
PCB boards
|
Short controlled cycle
|
Longer cleaning is not always better. Overcleaning may damage delicate surfaces, loosen coatings, or affect sensitive components.
Temperature Setting Reference
|
Material / Residue
|
Temperature Direction
|
|
Oils and grease
|
Mild to moderate heat
|
|
Glassware
|
Moderate heat if compatible
|
|
Plastics / rubber
|
Low temperature or room temperature
|
|
Biological residue
|
Avoid excessive heat
|
|
Electronics
|
Use caution, often lower temperature
|
A heated ultrasonic cleaner is most useful when the residue responds to warmth. For heat-sensitive materials, start with lower temperature and shorter cleaning time.
Frequency Selection Basics
Lower frequencies usually create stronger cavitation and are better for heavier contamination or durable parts. Higher frequencies are generally gentler and may be more suitable for delicate or precision surfaces.
For many laboratory ultrasonic cleaning tasks, 40 kHz is a common frequency because it offers a practical balance between cleaning strength and surface gentleness.
Safety, Maintenance, and Common Mistakes
Good results depend not only on the ultrasonic cleaning machine, but also on safe operation, correct maintenance, and consistent habits.
Safety Best Practices
Do not use flammable solvents directly in the tank. Do not put hands in the bath while the machine is operating. Avoid strong acids and incompatible chemicals. Use a basket instead of placing items on the tank bottom.
A lid can help reduce splashing, evaporation, heat loss, and noise. Ventilation, gloves, and eye protection may be needed depending on the cleaning solution and lab safety rules.
Maintenance Tips
Replace the cleaning solution when it becomes dirty, discolored, or less effective. Rinse and wipe the stainless steel tank after use. Keep the correct liquid level during operation. Inspect the basket, lid, drain valve, and tank surface regularly.
Avoid dry operation. Running an ultrasonic cleaner without enough liquid may damage the equipment.
Common Mistakes
Common mistakes include using plain water for all residues, skipping Degas after fresh solution change, overloading the basket, placing items directly on the tank bottom, using excessive heat, cleaning too long, forgetting rinsing and drying, and cleaning incompatible materials.
How to Choose a Laboratory Grade Ultrasonic Cleaner
Choosing a laboratory grade ultrasonic cleaner should start from the actual cleaning workflow. Tank size, basket size, frequency, heating, Degas mode, controls, and accessories should all match the lab’s daily use.
Key Buying Factors
|
Factor
|
What to Check
|
|
Tank size
|
Largest item size and daily batch volume
|
|
Basket size
|
Usable space, not just tank volume
|
|
Heating
|
Needed for oils, grease, and sticky residues
|
|
Degas mode
|
Useful for fresh solution preparation
|
|
Digital timer
|
Helps repeatable lab cleaning
|
|
Frequency
|
Match cleaning intensity and material sensitivity
|
|
Drain valve
|
Useful for larger tanks
|
|
Accessories
|
Basket, lid, beaker holder, drying support
|
|
Factory price
|
Depends on capacity, features, accessories, and customization
|
Standard Model vs Custom Requirement
Small labs may only need a compact benchtop ultrasonic cleaner for sample vials, small tools, or routine glassware. Routine labs may benefit from a digital heated ultrasonic cleaner with timer, temperature control, and Degas mode. Technical labs may need a larger tank, drain valve, stronger ultrasonic output, or special fixtures.
Industrial R&D labs may need custom ultrasonic cleaning equipment when parts are large, heavily contaminated, or require specific process validation.
For buyers comparing laboratory ultrasonic cleaner factory price, GT SONIC can be considered when standard tank-size options, digital control, heating, Degas mode, and practical B2B supply support are more important than over-specified custom systems.
Lab Cleaning Workflow Matrix and Troubleshooting
A practical lab ultrasonic cleaner guide should help users connect the item, residue, solution, settings, and caution points. The table below can be used as a starting reference.
Lab Cleaning Workflow Matrix
|
Lab Item
|
Common Residue
|
Suggested Solution Direction
|
Setting Focus
|
Caution
|
|
Glass beakers
|
Dust, fingerprints
|
Mild detergent / DI water
|
5–10 min, moderate heat
|
Avoid cracks
|
|
Pipette parts
|
Liquid residue
|
Neutral cleaner
|
Short cycle
|
Check compatibility
|
|
Stainless steel tools
|
Oils, grease
|
Mild alkaline cleaner
|
Heat + basket
|
Rinse well
|
|
Sample vials
|
Particles, residue
|
DI water / mild cleaner
|
Avoid overcrowding
|
Dry completely
|
|
PCB boards
|
Flux, particles
|
Electronics-safe solution
|
Short cycle
|
Dry before power
|
|
Dental tools
|
Biological debris
|
Compatible enzymatic cleaner
|
Pre-cleaning only
|
Does not sterilize
|
|
Precision parts
|
Oils, fine particles
|
Matched chemistry
|
Frequency + time control
|
Avoid overcleaning
|
Troubleshooting: Why Is My Lab Ultrasonic Cleaner Not Cleaning Well?
|
Problem
|
Possible Cause
|
What to Check
|
|
Poor cleaning result
|
Solution not degassed
|
Run Degas before cleaning
|
|
Residue remains
|
Wrong cleaning chemistry
|
Match solution to contaminant
|
|
Uneven cleaning
|
Items stacked or touching
|
Use basket, avoid overcrowding
|
|
Water spots
|
Poor rinsing or drying
|
Rinse with DI water and dry
|
|
Slow cleaning
|
Low temperature or dirty bath
|
Adjust heat, replace solution
|
|
Item damage
|
Overcleaning or wrong material
|
Shorten cycle, check compatibility
|
|
Tank discoloration
|
Incompatible chemical
|
Stop use and clean tank
|
FAQ About Laboratory Ultrasonic Cleaners
1.How does an ultrasonic cleaner remove soil?
An ultrasonic cleaner removes soil through cavitation. High-frequency sound waves create microscopic bubbles in the liquid. When these bubbles collapse, they release localized energy that helps loosen and remove particles, oils, grease, and residue from surfaces.
2.Can I use plain water in a lab ultrasonic bath?
Plain water can transmit ultrasonic energy, but it may not remove oils, grease, organic residue, or flux effectively. For better results, use a suitable ultrasonic cleaning solution matched to the residue and material.
3.What cleaning solution should I use in a laboratory ultrasonic cleaner?
The cleaning solution should match the residue type. Mild detergents can work for general residue, alkaline cleaners may help oils and grease, enzymatic cleaners may be used for biological residue when compatible, and electronics-safe solutions should be used for selected PCB cleaning.
4.How long should a laboratory ultrasonic cleaner run?
Many routine lab cleaning tasks start at 3–10 minutes. Oily or sticky residue may need longer cycles, while delicate parts should use shorter cycles and frequent inspection. Cleaning time should be adjusted based on results.
5.Do I need to Degas the cleaning solution?
Yes, Degas mode is useful after adding fresh solution. Degassing removes trapped air and helps cavitation become more stable during the first cleaning cycle.
6.Can ultrasonic cleaning sterilize laboratory instruments?
No. Ultrasonic cleaning removes soil and residue, but it does not replace sterilization. Medical or laboratory instruments may still require disinfection or sterilization after cleaning according to the required protocol.
7.Is ultrasonic cleaning safe for PCB boards?
It can be safe for selected PCB boards if the components are compatible, the cleaning cycle is controlled, the solution is electronics-safe, and the board is completely dried before power-on. Not all electronic components are suitable.
8.What affects laboratory ultrasonic cleaner factory price?
Factory price is affected by tank capacity, ultrasonic power, heating, Degas mode, digital controls, drain valve, basket, accessories, customization, and production requirements.
Conclusion
A laboratory ultrasonic cleaner can improve cleaning efficiency for glassware, tools, sample containers, PCB boards, dental tools, and precision components when it is used correctly. The best cleaning results come from matching the ultrasonic cleaning machine to the lab workflow, not simply choosing by tank size or price.
For daily laboratory use, buyers should pay attention to the cleaning solution, item loading method, Degas process, time, temperature, rinsing, drying, and material compatibility. When these factors are controlled, a lab ultrasonic bath becomes more than a cleaning device. It becomes a repeatable process tool for cleaner, safer, and more consistent laboratory


